Nearly all lenses - especially those for 35 mm and medium format cameras
- come equipped with depth-of-field scales. The purpose of these scales
is to provide the photographer with guidance on where a subject needs to
be in order to be rendered sharply in the image. We can also learn about
depth of field in any of a number of good books on photography. We are often
treated to copious tables, or to formulae derived for special applications,
such as close-ups.
The frequency of questions about depth-of-field in magazines, and my own
experience, suggest to me that something is a little bit wrong with the
official story. When I trusted depth-of-field scales, I was very frequently
dissatisfied with the results. In scenic photography subjects in the distance
were almost always substantially fuzzier than I wanted. I am happy to report
that there is a solution to the problem, and it does not rely on either
depth-of-field scales or tables. You can do it in your head. Then again,
you often don't even need to think at all.
Before I describe the solution, let me say what's wrong with the existing
philosophy. There's nothing wrong with the logic or the math. It's the basic
assumptions that have been surpassed by technology. The starting point of
the existing theory was that there is a limit on the resolving power of
films and lenses. That limit was said to yield a smallest spot having a
diameter equal to one-fifteen-hundredth of a normal lens's focal length.
Thus the maximum permissible "circle of confusion" is 1/30 mm
in diameter for a 35 mm camera with its 50 mm standard lens.
The problem is that today's films and lenses are capable of achieving a
resolution standard at least five times as stringent, and maybe more. But
if one enters that revised standard into the formulae, depth of field just
about disappears. And that doesn't square with experience either.
The honored way out is to say: well, that's true, but the human eye also
has its limits. The average eye can't see anything smaller than one one-hundredth
of an inch on an 8 in. by 10 in. photograph, it is said. And that translates
into, you guessed it, 1/30 mm on film. I don't pretend to have super eyes,
but that 1/30 mm standard doesn't always look sharp to me on a 3.5 by 5
in. print, let alone an 8 by 10. I don't think photographs meeting that
standard will win many sharpness competitions today.
What bothers me even more is the old story about maximizing depth-of-field
by focusing at the hyperfocal distance. If you follow that advice you will
be guaranteed that scenes in the distance will never be resolved any better
than mediocre. You will have sealed in that "minimum acceptable standard".
So what do we do? We start by reviewing how that circle of confusion
was determined. The cone of light concentrated by a lens at it's focus is
intercepted by a film not quite in the right place. The intersection of
the cone and the film is a circle: the circle of confusion. And the size
of the circle can be determined by simple geometry, as illustrated in Figure
1.
Figure 1: Light from a tiny object is focused some distance behind
the lens. If the film is closer to (or farther from) the lens than required
for perfect focus, the image will be a small circle. The diameter, c, of
that "circle of confusion" depends upon the focus error e, and
the focal length, f, of the lens as well as the diameter of the lens opening,
d.
This same scheme can equally be applied in front of the lens, as shown in
Figure 2. The rays of light from a small object in perfect focus also form
a cone, with the lens at the base of the cone. If some other object is not
quite in the right place, it intercepts that cone where it has some measurable
diameter. That diameter determines the smallest detail the lens can resolve
at that location. So simple geometry can tell us what objects can or cannot
be resolved.
Figure 2: We can reverse Figure 1 to determine how large an object
must be in order to be resolved in the image. The resolution spot size,
S, will depend upon the focus distance, D, the focus error, E, and the diameter
of the lens opening, d. An object smaller than S will be enlarged, indistinct
and reduced in contrast.
The rule for determining what objects are resolved is ultra-simple. We focus
our lens exactly at some distance, D, from our lens. An object one-tenth
of the way back from D, towards our camera (that is, at a distance of 0.9
D), will be resolved if it is at least one-tenth as big as the opening in
our lens diaphragm. If the object is one-quarter of the way from the point
of exact focus to the camera lens, it will have to be one-quarter as big
as our lens to be resolved. And so on. The same rule will hold on the far
side of that point of exact focus also. An object twice as far from the
lens as the point of exact focus will have to be as large as the lens aperture
to be resolved. For those who would prefer the math formula, it is included
with Figure 2. In this formula d stands for the lens diameter, and S stands
for the "spot size" - how big an object must be to be resolved.
Distance either side of the point of exact focus is given the symbol, E.
Now it's important here to understand that the "size of the lens"
is the diameter of the lens diaphragm at it stopped-down or working position.
If we are shooting at f/8 with a 50 mm lens, that diameter is 50 divided
by 8 millimeters: 6.25 mm, or about one-quarter of an inch. For a 300 mm
lens at f/5.6, the diameter would be 300 divided by 5.6, or 53.6 mm-about
two inches.
What this rule does, is give the photographer direct control of the problem.
The photographer can decide what must be resolved, and what need not. Or,
he can use the rule to ensure something will be intentionally blurred out
and unrecognizable. As the spot size increases relative to the size of the
object being photographed, the image of that object grows in size and fades
in contrast.
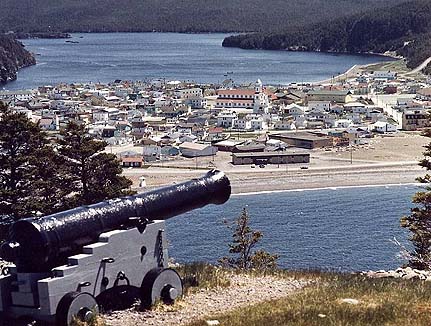
Caption, Figure 3: This scene, the village of Placentia in Newfoundland,
was taken with a 90 mm lens set at f/8 and focused at infinity. As explained
in the text, to have focused at the hyperfocal distance would have seriously
degraded the image of the village, while making negligible improvement to
the foreground. (Sorry, no GIF version - just too big as a GIF.)
Let me illustrate with an example. Figure 3 shows a photograph of the Newfoundland
village of Placentia. In the foreground are a cannon, some grass, some gravel,
and some trees. The picture was taken with a 90 mm lens on a Leitz-Minolta
CL at f/8. The aperture is thus about 11 mm in diameter. The hyperfocal
distance for a 90 mm lens at f/8 is 106 feet. The cannon is at a distance
of about 30 feet, and the distance to the village is about a mile: 5280
feet. Had I focused at the hyperfocal distance, the resolution spot size
at the cannon would have been 8 mm and at the village it would have been
0.55 meters or about 21.5 in. If, on the other hand, I focus at infinity,
the spot size is 11 mm at the cannon and 11 mm at the village. Or 11 mm
anywhere else, for that matter. True, diffraction effects won't let me resolve
11 mm at 5000 ft., but at least resolution at the village will be as sharp
as nature permits. The change in spot size from 8 mm to 11 mm at the cannon
would be almost impossible to detect in the image. The foreground is admittedly
not tack-sharp. But I can recognize the cannon, the gravel, the grass and
the trees. Had I focused at the hyperfocal distance the telephone poles
in the village would have been almost erased, and windows in buildings would
have been just blurs.
A corollary to this example is that there is really only one way to make
the foreground sharper, and still have a sharp view of the village. That
is to use a smaller lens opening. In this example, I could have reduced
the spot size to 5.5 mm by using f/16. Resolution of the village, however,
would have been slightly degraded by diffraction effects.
The general rule for scenic photographs, where one wishes to maximize the
depth of field, is as follows. Set the focus at the distance of the most
distant object. Then set the lens opening to the size of the smallest object
to be resolved in the foreground. No calculations needed!
The rule for estimating diffraction effects is also easy to express. The
diffraction limited spot size is given by D/1600d, where D is the distance
to the village in this case, and d is the diameter of the lens opening,
in millimeters. The units of measure for the spot size are whatever units
we use to express D. So, for D=5280 ft., and d=11 mm, we get the result
that the diffraction limited resolution at the village is 0.3 ft or about
4 inches. That is good enough to resolve telephone poles and window frames.
Had I used f/16, the spot size at the village would have increased to 0.6
ft., or about 7 in. That would resolve telephone poles, but window frames
would have been a bit blurred. All-in-all, this might actually have resulted
in a slightly superior photograph. But it was quite windy that day; I wanted
to use a higher shutter speed.
As a general rule, lens aperture diameters of 3 to 5 mm are often the optimum
for scenic purposes. Blades of grass and small branches are resolved, and
resolution of distant objects is about equal to that allowed by the majority
of modern films and lenses. This rule applies to all formats.
Another useful application for this approach to depth of field is in telephoto
close-ups-as of animals or flowers. With long lenses and large apertures,
depth of field scales are just about useless. But with just a little bit
of simple math we can figure out how much of that muskrat will be resolved.
If we are using an 800 mm f/8 lens to photograph a muskrat at 25 feet, we
have the following situation. The lens working diameter is 100 mm. In order
to resolve features of the muskrat 1 mm in size, that detail must be within
1% of 25 ft (answer: 3 in) of the point of exact focus. If the muskrat is
looking at us head on, and we focus on his eyes, his tail 1 foot behind
the eyes will be fuzzy, but will still be resolved. The reasoning is that
the resolution one foot past the point of exact focus is one twenty-fifth
of 100 mm, or 4 mm. The muskrat's tail is just a bit bigger than this. We
won't see every wet hair in his tail, but we will see the tail.
Simple, isn't it!
© Harold M. Merklinger, July 1992.
Go to/return to Further Information on Focus.
Go to/return to List of HM's Articles available
here.
Return to How to Obtain Merklinger's Photo Books.
Return to the Merklinger's Photo Books Table of
Contents.
- End of File -