I have been keen for some time to be able to make good black and white prints from a computer. I have not been happy with most of the results I've obtained until recently. When I read that the HP Photosmart 7960 shipped with gray inks in addition to colour inks, I had to give it a try. It claims 73-year life for colour prints on HP Premium Plus papers and 110-years for (dye-based) black and white.
Ctein has written an excellent review of this printer; it's published in the July/August 2004 issue of Photo Techniques USA (pages 41-44). He gives the printer high praise for its resolution and black and white capabilities, and I generally agree with his assessment. The reason I am writing this review is that there is a lot he did not say. This is a ground-breaking, affordable printer and it probably says a lot about how we can expect printers to develop in future.
The 7960, in addition to 'just' being a colour and black & white computer printer, is a stand-alone picture processor/printer with a number of capabilities. It includes a card reader (for all current formats except PCMCIA) and a colour image display. It even has its own scanner, although the scanner is reserved for the printer's own purposes. It can crop and print one image at a time from your memory card, a range of images, or specific selected images. It can print them one at a time or in "combo" layouts. It does 'contact sheets' and "proof sheets". It claims to remove red-eye, add fill flash to your images, and even re-focus your pictures. It also offers to convert your images to black and white, sepia or "Antique". (I did not try these effects.) It will print direct from some digital cameras. In short, it tries to be your home mini-photo-lab.
This printer has its weaknesses as well as strengths. I am not recommending it as the answer to everyone's prayers. It has its warts and limitations, as we shall see. For a start, it is essentially limited to letter-size (8.5 by 11 in.) and smaller prints, although it will also do banners. We should not expect to see HP Premium Plus Banner Paper any time soon, I expect.
This is a USB (Universal Serial Bus) printer with front and back USB ports. The system requirements are essentially Windows 98 or later on the PC side and OS 9.1 or later on the Mac side. There appear to be limitations with specific operating systems and configurations, however. There also significant requirements for disk space, memory and such.
My own experience with the Windows operating systems is somewhat limited and I will not comment on the limitations placed on the printer in that environment. When I use Windows it is usually either on Virtual PC for Mac or on an old OrangeMicro PC embedded in a Mac. So any observations I could make on Windows performance would be tainted by the Mac connection. Suffice it to say that Ctein's review included experience with Windows: he found it impossible to get good colour reproduction from a Windows machine. I tested this printer using Mac OS 9.1, 9.2, 10.2.8 and 10.3.4 on a 500 MHz G3 and a dual-processor 1.25 GHz G4.
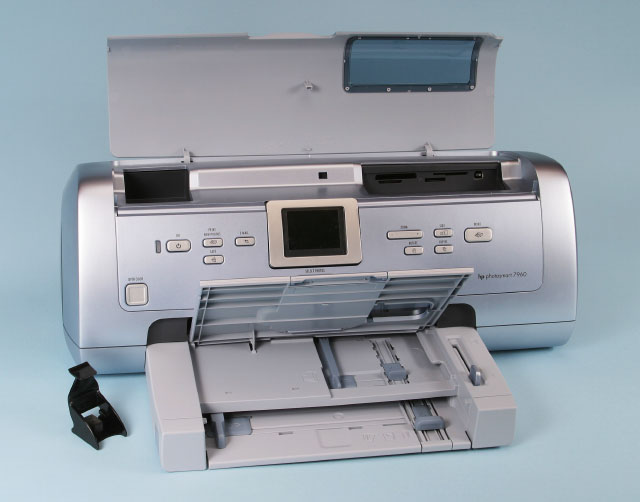
Here's the printer itself with top cover opened to reveal card slots, front USB connector and storage area for unused ink cartridge. The 'slipper' at lower left is a clip-on cover for a temporarily unused ink cartridge.
This is a small printer, although not especially compact. It uses the traditional HP DeskJet layout with a paper tray in front and the output tray on top of that. It also has a separate small tray for 4 by 6 in paper between the traditional input and output trays. The printer measures about 20 inches wide by 15 in. deep by 8 in. high, but it does not 'fill' that space; it is not a 'brick' in shape. An optional second "lower" paper tray is apparently available as well as a duplex unit for double-sided printing.
The printer comes with four ink cartridges. It claims it can operate with any two. Photographers will want to load three ink cartridges: Color (yellow, cyan and magenta), Photo (black, light cyan and light magenta) and Gray (three shades of gray). This makes a total of nine inks. The cartridge most photographers will probably not use is just black intended for printing text-only.
When the power is applied for the first time, or after changing an ink cartridge, the printer has to re-align itself. It does this automatically using a sheet of plain paper, using the built-in scanner to interpret and verify the results. There is also an optional user-invoked "color-calibration" in later versions of the driver that requires a small amount of human judgment.
Paper goes face-down in the paper trays. The instructions say one should avoid touching the printable side of the paper when placing it in the trays. That's hard to do when the printable side is the bottom side! The trays are also full of holes and ridges that love to catch the paper as you try to slide it in. The 4 by 6 tray is especially difficult to load. The instructions say to move the "width guide" all the way to the left before loading the paper. This is essential! This tray has been designed to prevent you from pushing the paper all the way in unless you do this. Even when one does push the width guide all the way to the left, one can still have trouble. It's easy to think the paper is in all the way: it has come to a firm stop and the lid can be closed, but it still may not be far enough in to engage the pick-up rollers. This tray seems to have been designed specifically to be difficult to load; it did not have to be like this.
The instructions say to load each tray with only one type of paper at a time. Remove the plain paper before sliding in a sheet of photo paper etc. I presume this is because the printer tries to identify the paper type automatically. Whether it uses the built-in scanner for this or some other sensor, I don't know. In the one case where I did put a sheet of photo paper on top of a stack of plain paper, the printer dumped all the plain paper through the printer unused and then, with just the one sheet of photo paper in the tray, gave me an out-of-paper indication. In this case I simply pushed the "OK" button to resume. One of the nice things about having a reasonable display on this printer is that it gives nice clear instructions on what to do next.
The printer sometimes operates quietly, and sometimes clunks and bangs unexpectedly. It all seems to depend upon what print mode it is in. The highest resolution mode is the noisiest.
The printer seems to put itself to sleep in stages after periods of disuse but will sometimes 'wake up' on its own even after it has been "turned off" by the user. On two occasions it would not wake up until after I unplugged and re-plugged it from the electrical power.
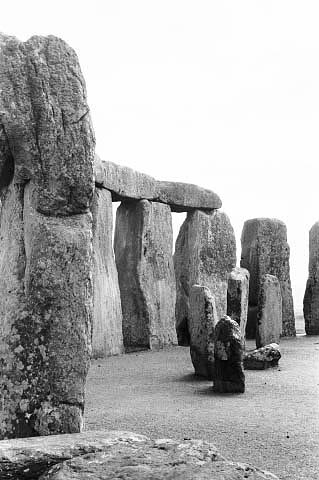
Here's a sample black and white image that printed beautifully on HP Premium Plus Matte paper. This photo of Stonehenge was taken in 1968 when the stones were 'just there' standing in a field (no parking lot, no admission, no fence etc.) The camera used was a Leica IIIf with 50/2 Summitar. Exposure on Kodak Plus-X was probably about 1/30 sec at f/8 (under heavy overcast). The film was processed commercially.
I started printing under Mac OS 9.1. Naturally I was anxious to try B&W printing first. The very first attempt was superb! I simply opened a B&W image in Photoshop 6 and printed it in "Best" mode. I did search for an appropriate printer profile to use. The only one it seemed that the installer had added was called "HP 900 Series DeskJet" so that is what I used. I subsequently found a technical tip on the HP web page that said to use sRGB. That worked too, although when I tried printing from PageMaker, the application would not let me select sRGB (probably reasoning that sRGB is a monitor profile, not a printer profile). B&W images printed on HP Premium Plus paper just the way I wanted them to. And this experience continued with System 9.2. Prints on both HP Premium Plus papers were very close to neutral in colour tone. To the eye these prints look exactly like 'real' silver-based prints. And even under a magnifier they are impressive.
These prints were the highest-resolution prints I have seen come from a computer printer. I tried looking at my image file in Photoshop pixel-for-pixel and successively reducing the resolution until it matched what I could see in the print using a 10x magnifier. Somewhere between 400 and 450 pixels per inch! This is better resolution that most traditional (silver-based) colour printing materials.
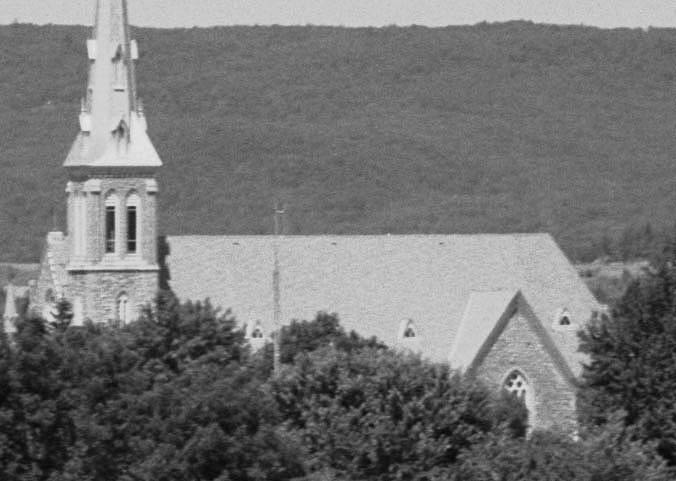
Here's a direct comparison of a 1250 ppi scan of a small portion of a large format (5 by 7 inch) negative
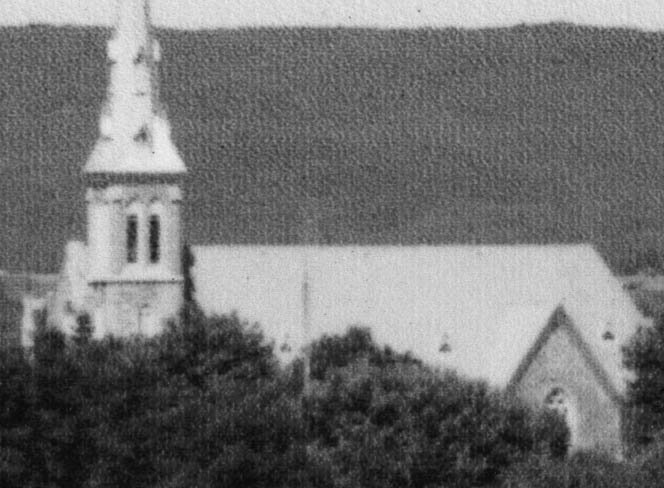
and of a contact-sized print made from it on HP Premium Plus Glossy paper using the 7960. Viewed pixel-for-pixel these illustrations represent a 15 times enlargement of the negative. One can easily see even in the print that the three windows along the lower portion of the roof of the church are each composed of three basic panes. These windows are nearly-invisible dots when viewing the print directly. In the scan of the print we can see the vertical micro-streaking that is actually perpendicular to the motion of the print head. These streaks are entirely invisible to the unaided eye. Overall, this represents remarkably high resolution for an ink jet printer.
Colour prints, too, were high resolution. I could see essentially all the information from a 6 megapixel image in a roughly 5 by 8 inch print! (Update: in continued use of the printer, I have noticed that this observation is not always true: it depends upon the image! Resolution is still an issue in low-contrast areas.)
I did initially have trouble (as Ctein did) printing in colour. Colour was not "bad" but it was not "right" either. The tip needed was that one just mentioned with respect to B&W: use the sRGB profile. This seems to be an sRGB printer when using it from a computer. (HP Technical Support told me this would probably change with a future driver revision. One can select sRGB or Adobe RGB when printing from memory cards or direct from cameras using the printer's front panel, but these settings seem not to apply for printing from a computer.) Once I selected sRGB in Photoshop's output space, colour looked reasonable.
There is a "HiRes" setting possible when printing in "Best" mode. Checking this box did not seem to do much. Yes, in B&W printing the resolution did improve but there was also some very fine streaking in the image that might interfere with the image detail. This streaking is not visible to the unaided eye; I only saw it using my magnifier. I thought it might be a clogged nozzle, but then I noticed the streaks were in the wrong direction: the streaks were perpendicular to the direction the ink jets move. Re-alignment did not help. For colour images, checking "HiRes" seemed only to desaturate the image slightly and alter the colour slightly. I didn't use it further with colour.
B&W images appeared to use only the black and gray inks in "Best" mode, but all colours in "Normal" mode. This was true whether I had actually set the printer driver to print in colour or grayscale, and whether I used a B&W file or a colour file that had been desaturated. There was a very slight cooling of the image tone when the colour inks were used.
I also tried printing from PDF documents. Initially the prints were too dark. When printing from PDF it is not possible to select the printer profile (except in ColorSync mode where the only choice available was "Photosmart 7900 Series". The work-around was to set my monitor (!) profile to sRGB at print time. The "ReadMe" file that installed with the driver contained a very long list of incompatibility issues with specific applications including Acrobat. The note stated that with PDF documents the printer's portrait/landscape setting is overridden by the PDF file and thus documents containing both portrait and landscape oriented pages may not print properly. I tried one such document under Acrobat Reader 5. It printed correctly.
The printer driver offers some measure of control over colour such as lightening or darkening, warming or cooling the image etc. In my testing, however, even the smallest such adjustment was "too much" and I never printed a satisfactory image using the provided controls. Fine tuning of the image within Photoshop was necessary. (With Epson printers I often use the Color Controls mode to fine-tune a single version of an image for different papers.)
"Borderless" does not mean borderless! In the Page Setup dialog box there is a check box beside "borderless". I presumed that checking this box would force an image to print borderless. That's not what happens. A related early frustration I had was not being able to print an image centered on the page. The image came out of the printer centered in the printers "printable area". Then I tried checking "borderless". If the image is smaller than the page, it will print nicely at the specified size, centered on the page! "borderless" simply means that the entire area of the paper is available for printing. In order to print borderless, the image size must be set larger than the page size.
Ctein said he saw "tracks" in at least some of his prints, but that another 7960 user had not. I did, and I didn't. Some prints were clean. Some prints had tracks that wiped off easily, presumably being just a bit of oil from the printer mechanism. Some tracks seemed to appear only when I put the printing sheet through the printer twice. In these cases the tracks only affected the first print. The HP Premium Plus papers have a gelatin coating that swells with the application of ink. These tracks were only in the swollen gelatin. Some of these disappeared when the gelatin dried out and some did not. The worst examples of tracks or scrapes occurred only when I fed one sheet at a time into the 4 by 6 tray. If I put a stack of paper in there, there were no tracks! HP is aware of these problems and simply offers the advice to keep one's paper flat; don't let it curl. Personally, I think the printer could use a detail re-design to prevent all sorts of snags, scratches etc.
I mentioned that the Premium Plus paper swells. Ctein said it took 5-10 minutes to dry. Maybe it's the Halifax weather this July. I found the Premium Plus Glossy paper took a couple of hours to become less sticky, a day to become dry to the touch, and about three weeks for the gelatin relief image and gloss to recover.
A noticeable secondary effect of the swelling is that the glossy printed image will show matte areas. Skies whether B&W skies or cyan skies were generally more matte initially than the matte paper! But the gloss recovers somewhat after a week or two.
Oops, I mentioned the HP Premium Plus Matte paper. It isn't matte. This paper is semi-gloss, or pearl, or something other than matte. But it is a great paper. It was not susceptible to the tracks or scrapes, it did not feel as sticky when new and it definitely did not take a week to reach its final appearance. (As of March 2005, this "matte" paper seems to have been re-named "soft gloss"!) Why do they not sell the 4 by 6 paper in this surface? It is a most successful paper!
I did not see much colour change as the paper dried. The only way I could detect it at all was in those cases where I printed up to four successive times on a single sheet of paper. I could see minor differences at first when the images were right next to one another. If I compared separate pieces of paper I could detect nothing.
I also tried the HP everyday Matte paper. Colour prints looked fine, better colour than Epson 1280 prints on Epson Photo Quality Ink Jet paper. Black and white prints on HP everyday Matte looked very slightly green to my eye in most light, but I also saw it as slightly red in some lighting contexts. In any case the colour shift is small and I'd venture that most people would not notice. B&W prints made on this paper were not quite as detailed as on the Premium Plus papers but were still sharper than any other non-HP ink jet prints I have seen. And the very fine streaking I saw under a magnifier with the Premium Plus papers in HiRes mode was completely absent.
I tried printing B&W on Epson Enhanced Matte paper also, using the "other photo paper" paper selection. Print density was fine, but the image colour was slightly yellow or yellow-green. Clearly paper type has a direct influence on apparent ink colour.
I found that under OS-9 that the printer paused from time to time presumably either as the computer was preparing data for the printer or as the data was being sent to the printer. The pausing was longer and more frequent when printing large image files. Also, while printing was progressing, it was difficult to use the computer for other purposes. Under OS-X all was smooth, pause-free, and there seemed to be no slow-down of the computer while printing.
Consumption of gray ink was significant, even when printing colour. In my testing a gray cartridge lasted for about the equivalent of 30 7 by 10 inch prints divided approximately one-third colour, two-thirds black and white. A significant amount of printing was done after the printer utility indicated that the gray ink had run out. The good news here, I guess, is that the printer allows one to proceed in spite of the indication. An Epson printer will simply refuse to print. The second gray cartridge ran out with the other two cartridges still indicating 50%. Expect to use lots of gray ink!
I spend about 15% of my computing time with OS-X and most of the remaining 85% with OS 9.2.2. I avoid OS-X primarily because of the many printing problems I have encountered with it. I recently completed a book layout in InDesign. Because of a page-numbering bug in the OS 9 version of the program I had to work primarily in OS 10.2.x. But I always printed drafts, tests, etc. under OS 9. Under OS-X the layout was not precisely as specified and, to my great astonishment, some words were even spelled incorrectly in the OS-X printed version!
I'm prepared to accept that the fundamental problem is that I don't understand printing in OS-X. I don't read a lot of complaints on the web today, although there were many at one time. (Another possible interpretation is that most other users who need to print accurately and predictably have abandoned OS-X.)
I thought nevertheless that I really should test this printer under OS-X. The driver installed without a hitch. The driver does behave slightly differently than under OS 9: the words are a bit different and there are more profile choices with ColorSync. I printed a colour sample; it was slightly different from the print made under OS-9, but well within the boundaries of acceptable. Then I tried B&W. I got dull, lifeless prints with much detail completely missing! It tried every setting change and profile option I could think of without success.
I had not read the ReadMe file installed with the OS-X driver; I had assumed it was the same file I had seen under OS 9. After using about one-third of the ink in the gray cartridge on troubleshooting this problem I decided to find out if by chance there were any special instructions in the ReadMe file. Here's what I found: "The following features of the OS 9 software are not available with the OS X software, but HP and Apple are working to add them to future releases: ..(a list of eight items the last of which is)..Black & White printing." Well, the setting is there; it just doesn't work properly! I can reproduce the effect using the Image Adjust Curves function of Photoshop: Draw a straight line at 45 degrees from gray 0 to gray 128; then go straight across holding the output at 128 until about gray number 192; then continue at a sharper angle to output gray number 255 at input gray number 255.
I am happy to report that in September 2004, HP released an OS-X update for their Photosmart series printers, and that black & white printing under OS-X now works as it should.
As mentioned earlier, this printer does a lot of things besides simply print from a computer.
Card Reader The printer has 4 slots for accepting memory cards: Compact Flash Types I and II, Microdrive, MultiMedia Card, Secure Digital, SmartMedia, XD Picture Card and Sony Memory Stick. The reader can be used to print direct from memory cards as well as to transfer files to the computer. In my tests transfers were a bit strange, and slower than two other USB 1.1 card readers I tried. For some inexplicable reason, transfers of a whole card started off very slow: about 4 MB per minute. Part way through the download, however, speed would suddenly increase to about 30 MB per minute. This occurred under both OS 9 and OS-X. Transfers of selected files from a single folder seemed to transfer consistently at about 30 MB per minute. The other card readers were consistently around 38-40 MB per minute for USB 1.1 and about 200 MB per minute under USB 2. A slight downside of using this printer as a card reader is that if a computer is on and connected to the printer, the card must be properly put away (drag-to-trash, eject or prepare to remove card) on the computer before it is removed from the printer. This requirement is easy to forget when just printing an index sheet from a memory card. The card-reader function works only with the rear USB port of the printer. Only one card slot can be used at any given time. There is a feature for initiating file transfer of all or "just new" images from the printer, but I did not attempt to use it.
Print from Memory Card Without a computer attached, the printer can be asked to print all images, several selected images, or a range of images. Print size, border or borderless, number of prints and "combo pages" can be specified. Combo pages are arrangements of several images on a single page. The printer can read baseline JPEG, and the most common TIFF formats (including Lab colour). I did try putting Photoshop baseline JPEG and TIFF files on a card and they printed without difficulty. There are certain maximum print size restrictions for low-resolution files. Images can be zoomed and cropped using the printer's LCD screen and front panel buttons. The zoom and crop specifications can be set individually on each selected image before batch printing is begun. For some reason, my D-60 photos worked fine printed in this way but S-50 images were printed dark, gray and with low contrast. The brightness could be adjusted using the image-specific brightness setting and the contrast was improved somewhat by turning on "Improve Contrast" in the printer settings. The contrast improvement was entirely adequate for some images but not all. Prints made directly from the S-50 to a Canon i70 printer were superior in colour and tone although not as detailed and they show a slightly visible dot pattern.
There is a "Print New" feature that will print all previously unprinted images on a card (not just the new images added since the last printing session). Perhaps there needs to be a way to mark images never to be printed. It is also possible to add pre-programmed fancy borders to a print such as one that says "Happy Birthday" in user selected colours. I tried the red-eye removal feature on one image with obvious red-eye but the printer returned the message "Could not find red-eye."
Print Index Pages The printer, with or without a computer connected, can print thumbnails of all images on a memory card. In the case of cards from my Canon D-60 and S-50, these are printed 63 to a page. Each image is accompanied by its file name. I found this to be a very handy capability. About all I would ask for is some control over the layout so that I can leave space along the left margin for binding. There is a margin along the top, however. For some reason movies are included in the Index Pages, but not in the Proof Sheets discussed next.
Select and Print using "Proof Sheets" The printer can also be requested to print "Proof Sheets" which consist of 20 images per page (small, but larger than the thumbnail images of the Index Pages) along with file names and some other graphics used to 'order' prints. Images are selected for printing by filling in a small oval below each image. Then 1, 2 or 3 copies of each can be 'ordered' by filling in one of three similar ovals. The next step to specify the size of the print and/or the arrangement of multiple images on the page, again by filling in one more little oval. Then the sheet is resubmitted to the printer face down and scanned by the printer. The printer then proceeds to fulfill the print order. As many of the Proof Sheets will be printed in rapid succession as needed to show all the images on a card. But the proof sheets can be fed back into the printer only one at a time.
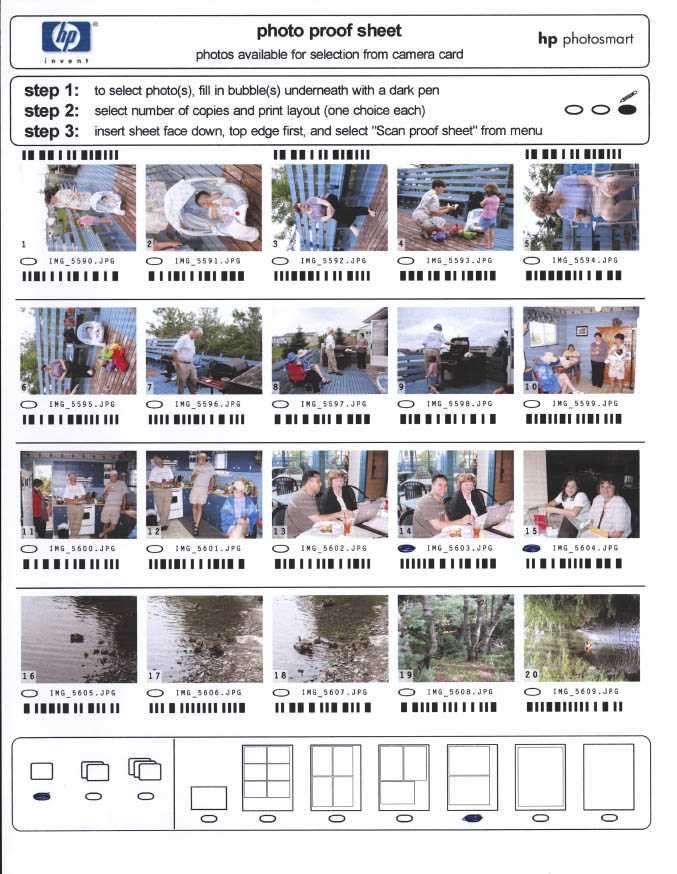
Here's a sample Proof Sheet from a Canon S-50 memory card along with the completed print job. Colour in the Proof Sheet was fine; colour in the final print was poor in this example.
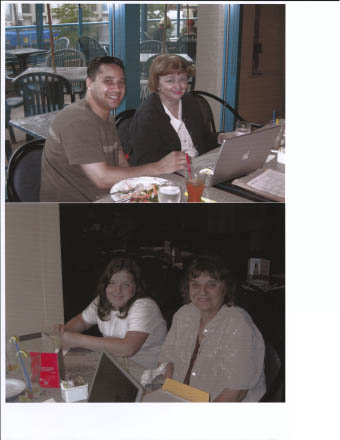
And here's the resulting printed page.
Print Album Pages The printer can also be asked to print images two, four or six to a page. Images can be selected from those on the memory card and can be rotated 90 degrees one way or another if need be.
Direct Print from Camera Some HP cameras will print directly to this printer. I initially thought that some non-HP cameras might also work. My Canon S-50, for example, offers "Canon Direct Print" capability and I hoped that perhaps "Canon Direct Print" and "HP Direct Print" might be compatible. I could not make it work, however. The front panel USB connector is the wrong type to mate with the Canon camera-to-printer cable, but even with an adapter, the HP printer and Canon camera did not communicate with one another. I read both camera and printer manuals carefully but could not make this work.
Print Camera-Selected Photos Using the Direct Print Order Format (DPOF file format 1.1), images selected for printing by the camera can be printed from the memory card. This is supposed to work with non-HP cameras, but I did not try it.
e-Mail The printer claims to be able in conjunction with a connected computer to e-mail selected images to a pre-determined e-mail address. I did not try this feature.
Slide Show Since the printer has a small LCD colour display, it can be used to display all images on a card to a small group of people, changing the frame at approximately 5 second intervals.
Print from Video If a video file is selected for printing from a memory card, the printer will print 9, 16 or 25 frames from the file. How these frames are selected is not described. I did try it, but I still don't know how it selected the frames to print.
A minor criticism of this printer would be that not all the capabilities of this printer are described in the printed guide or the (somewhat more complete) on-disk help files. And many features that are mentioned are too poorly described to really figure out what to expect. The video printing item above is a good example of this.
Ctein's article and some of the literature on this printer talk about 6-colour and 8-colour printing. The only place I found to set the mode explicitly was under ColorSync with OS-X. But the real mystery to me is: when one specifies 8-colour printing, which colour is not used? There are, after all, nine different inks in those three cartridges.
This HP 7960 printer tries to be a mini photo lab as well as a general-purpose computer printer. I suspect that I, and most 'serious' photographers, will not use many of its features, generally preferring to control special effects in a photo-editing program such as Photoshop. Yet, a number of the printer's features are definitely quite useful. I include here the ability to print index pages and even the "proof sheet" ability to print arrangements of selected images. I expect it could be quite useful for giving customers immediate proofs from a day's shoot, as well as a document of all images taken, complete with identifying file numbers. Strictly as a printer, this is the highest-resolution computer printer I have encountered, and the easiest way yet to print in high quality black and white. Claimed print life is impressive. And the built-in scanner definitely takes the tedium out of printer alignment. This and the modest price will be enough to attract many to the HP camp.
I would stop short of giving the printer an unrestricted recommendation; there are significant limitations and potential problem areas. Images may be damaged by the printer, prints may take longer than expected to dry, and I never did feel, for example, that colour was completely under control except when printing from Photoshop. And, of course, one is essentially limited to printing on letter-size and smaller paper. Some of these issues can be addressed through software updates; some cannot.
To me, the most significant aspect of this printer is the insight it provides on the future of printing: high resolution, long-lived quality black and white as well as colour, automatic alignment, stand-alone capability (working without a computer) and ability to accept hand-entered instructions. It is not a big stretch to imaging future printers that profile themselves on any paper stock and perhaps even accept basic very basic dodge and burn instructions.
I have not been a particular fan of HP printers (I have owned two), but Hewlett-Packard is to be applauded for this one. It definitely moves the field in the right direction, and at an affordable price.
The Type 59 gray ink cartridge can also be used in place of the colour cartridge in a number of other HP printers. This may offer photographers other possibilities for out-of-the-box black and white printing. Unfortunately I only tested the 7960 and thus cannot comment on the results that should be expected with these other alternatives. The 7960 was discontinued in about September 2004, replaced by the similar-featured 8450.
You can find other reviews of the HP Photosmart 7960 and 8450 printers at Photo-i.
A strange problem occurred on 28 November as the printer was printing its 300th print: a 4 by 6 inch colour print. About three quarters of the way through the print, the printer slowed to perhaps one-hundredth of its normal speed. It did complete the print job about 20 minutes later. One could barely see in the print where the slowdown occurred: most colours went unchanged but distant dark green trees turned light magenta. The slowdown affected everything. It did not matter if one was printing from a computer or from a memory card. It took 21 minutes to print a test page. The text on the test page was perfect even if the nozzle check section showed several inks (including black) missing completely. The colour bars generally faded in from the left and three showed horizontal striping. A call to HP's "24 and 7" (according to the printer manual) help line brought the recorded message "You appear to be calling outside our normal hours. Please call back during our normal office hours...."
I called again the next morning and spent an hour with a very helpful lady. To make a long story short, the problem was traced to a faulty print cartridge - the type 58 (which the test page indicated still had about 20% of its ink when the problem started). After replacing the cartridge and doing a master reset of the printer, all was returned to normal. The assistance I received was excellent. The diagnostic technique worked well; instructions were clear and I felt the whole while that we were making progress. The only reason it took so long was because the printer was responding so slowly. For example, it would take two minutes just for a piece of paper to load and a further minute before printing would begin. It would take three or four minutes to cancel a print job etc. Some time was lost while I searched the house for - believe it or not - a coffee filter!
The master reset process was surprisingly complex: 1. Open top cover and remove all ink cartridges. 2. Unplug power. 3. Remove back door and any paper in the machine. 4. This was the hard part: through the front, locate a small white plastic block deep inside at the left of the printer, and hold it in. Simultaneously, through the back, rotate the paper pick-up rollers about two turns (and they are quite stiff). 5. Replace back door. 6. Load letter-size paper in the printer. 7. Plug in the power. 8. Replace the ink cartridges and close the top cover. If all has gone well, the printer will commence to print a calibration page. We had to do this three times, I believe, in order to diagnose and correct the problem.
Why a faulty print cartridge should cause such a slowdown, I have no idea.
While I give high praise to the assistance I received by phone, I should also note that I have also submitted two previous service questions by e-mail, and both have gone unanswered except for the immediate automatic reply. Update to the update: I did hear back via e-mail about this latest problem on 1 Dec. I estimate that it would have taken about an hour hours to complete the tests recommended and I would not have been any closer to solving the problem. Phone support was much more effective in this case!
Further Update 31 March 2005: Just over two months ago, the printer driver threw up a dialog box stating that all three ink cartridges were defective and needed to be replaced. I could still check ink levels and they showed 60 to 100% of ink remaining. I removed all three cartridges and re-inserted them. I did a simple black-only print job and that caused no problem but I was reluctant to try a significant print job before I needed to, lest it lead to hours of troubleshooting. The requirement to use the printer arose about a week ago, and as I had free time, I gave it a try. The first thing I did was to run a nozzle check (using the printer's own menu): 100%! That's the good news! The bad news is that although the computer knew the printer was there, it did not seem to be able to communicate fully with it. An attempt to print would result in a message something like "Please ensure your printer is connected to the computer". Well it obviously was, because the Mac's "Chooser" could 'see' the printer. I had had problems like this before, and power cycling the printer (by unplugging and re-plugging its power cord) seemed to fix the problem (off and on with the printer's power switch would not do it). This time, however, power cycling did not work. A test of the USB port on the computer showed that other printers and a card reader would not function on that port either. Re-starting the computer fixed the port problem and now re-connecting the printer's USB cable allowed me to print without difficulty. The reported ink cartridge problem has not so far reappeared. It is equally clear, however, that faulty ink cartridges were not the problem in the first place. And both the computer and printer have survived several re-starts. The bottom line here is that the printer has proven troublesome, although there has been no major malfunction.
After about a year and a half of intermittent use I have a few additional comments.
Problems similar to those reported immediately above have continued. It seems that whenever the printer is left unused for significant periods - a few days to 2 weeks - the printer becomes unresponsive and somehow kills the USB port. But unplug/replug the printer power, unplug/re-plug the USB connector and then re-start the computer gets all going again.
Some good news is that long periods of disuse - up to 2 months - do not seem to lead to any clogging. After a long period of disuse with any ink jet printer I will generally do nozzle check. And this printer has always passed!
The black and white prints are not impressing me as much now as they did originally. Although image colour is consistent, the prints generally look somewhat green, especially under some lighting conditions. In comparison with B&W prints from other printers, the HP prints also seem to lack 'snap'. I believe the fundamental problems are that the Dmin is not as low as for other prints and the denser tones generally look 'vailed' like some conventional b&w RC papers. The Dmin problem is a characteristic of the paper; even unprinted HP Premium Plus paper looks a slight greenish gray compared to Epson papers. And it is RC paper.
Back to Digital Black & White page.
Back to Main Page Table of Contents.