On this page we'll have a look at the state of black and white photographic reproduction in this new age of digital photography. By now (2004) it is pretty clear that the immediate future of photography lies with electronic light sensor arrays, digital recording of one form or another, and printing with some sort of printer driven by digital data. I suppose we should not neglect to use of digital projectors or even other forms of digital displays. The commercial emphasis has, quite naturally - since it's easy to do - been with image capture and reproduction in colour. There is, nevertheless, significant interest in black and white (grayscale) images.
One might expect that since we can deal quite effectively these days with digital colour images, dealing with black and white should be trivial: just get rid of the colour. If one starts with a colour image, just use Photoshop's "Desaturate" command, save the file as grayscale and print on virtually any printer. It turns out, the process is not quite that easy. The problems include image resolution, and, more difficult, printing.
Pleasing images usually contain a lot of detail or information. It is often not a matter of having some sufficient number of actual recognizable objects in the image. Detail includes things like "texture" and colour variation. When colour is removed from an image, the eye still demands the requisite information, but, of course, colour cannot form part of that requirement. The result is that the eye wants to see higher resolution in monochrome images than it needs for colour images. As a result of this situation, colour films have typically needed to have about one-third to one-half the resolution capability of black and white films in order to produce images of comparable impact. To put it another way, if 6 megapixels are enough for colour images, comparable black and white images need as much as perhaps 25 to 50 megapixels.
Fifteen years ago (1990) I thought the greatest barrier to digital photography would be printing, and I thought quality black and white printing was probably just around the corner. After all, I could produce recognizable grayscale images on a 300 dot-per-inch (dpi) laser printer. Can the 5000 dpi laser printer be far behind? The reality is that colour ink-jet printers have developed faster than I had ever imagined. True photographic quality inkjet printers not only exist today, but are surprisingly low in cost.
Current colour inkjet printers probably have sufficient resolution to produce decent grayscale prints - we'll discuss a caveat or two a bit later - but the results are often less than convincing. While inkjet colour prints generally appear to be as good as or better than traditional colour prints, typical inkjet grayscale prints will not be mistaken for their traditional silver-chemistry-based equivalents. The problem area is, ironically, image colour. There are at least three colour problems, but all of them stem from the fact that our eyes are remarkably critical of near-neutral colour and colour differences. The three problems might be called image tone, variation of image tone, and metamerism.
Traditional black and white images are seldom - if ever - neutral gray in colour. They tend to be yellowish or brownish. The papers used for black and white prints too tend to be yellowish. There are lots of variations. Although the average person is not consciously aware of the tone of traditional black and white prints, the experienced photographer will often be able to look at a print and make a pretty good guess about the paper's manufacturer, the developer used and any specific image toning that was done. It's rather like recognizing fine wines; the differences can be obvious or extremely subtle, but the factors needed to distinguish one from another are quite definitely there. Getting that tone right with Photoshop and an inkjet printer is not an easy task. Still, who is to say what the 'right' image tone is. It comes down to preference. And maybe someday we will all agree that grayscale images look best with a tone that cannot be achieved the traditional way.
A bigger problem, at least for me, is that typical inkjet grayscale images are not uniform in tone. Some shades of gray might look reddish, some purplish, some bluish and some greenish - and this is all in the same image! Traditional images have some tonal variation due to the colour of the paper, the colour of light transmitted through the silver (or whatever) deposits and the colour of light reflected from the silver or whatever. There's a system and consistency to these variations and we are conditioned to them. Inkjet prints just don't look right by comparison, and results are not always consistent.
The tonal variation with inkjet printers can be minimized by using just the black ink, but then the dot pattern tends to become too visible and resolution is often insufficient. Introducing one or more shades of neutral gray helps a lot. In principle this would seem to be the right way to go, but to date, so far as I am aware, only one mainstream printer manufacturer has seen fit to mass-produce printers with more than two shades of black/gray.
I'm not sure we are using the proper word here, but it is the word that most people use. My understanding of the phenomenon of metamerism is that two substances - inks or other materials - may have different spectral reflectance characteristics and yet look to have the same colour to the average human eye. This is not what we mean in the context of inkjet printing, however. In the present context, the word metamerism is used to describe a single material (ink) that appears to be different colours under different lighting conditions. Specifically, most inkjet grayscale prints tend to look slightly magenta under tungsten light, greeninsh under daylight and who knows what under various types of fluorescent lighting. Typically one can fine-tune the inkjet printing process to yield an acceptable colour under one lighting condition, but then it looks wrong under other circumstances. Or, one can strive for a compromise that looks least wrong under several expected conditions.
Well, the simple result of all this is that despite many attempts to produce quality black and white images using modern digital techniques, my successes have been relatively few. In many ways the most satisfactory black and white prints I have made were those done years ago on a laser printer. They lacked resolution but all-in-all they looked better than most of my inkjet black and white attempts. Just over a year ago, I decided to address these issues through appropriate assessment of a few commercially available products.
For some time I've had a scanner adequate to scan prints and medium-format or large-format negatives with a resolution adequate for the purpose, but I could not scan my 35 mm negatives well enough. The (original) Minolta ScanElite 5400 looked like the required tool. My review of the scanner can be found here. The review is not restricted to black and white applications.
There are several gray ink sets available on the market and I chose to try the Ink Jet Mall's PiezographyBWicc cartridge system for the Epson 1280 printer. Results were good, but like others, I found the clogging problems to be a major deterrent.
To my knowledge, only HP has marketed a mass-produced printer having a viable out-of-the-box grayscale capability. It also does colour, of course. Otherwise it would probably not sell in sufficient numbers. My review of the HP Photosmart 7960 printer can be found here. This printer is now discontinued; it has been replaced by the Photosmart 8450 of similar specification. The HP gray ink cartridges will also apparently work other HP printers. I am somewhat surprised that HP has not marketed these printers widely as Black & White capable. Also, the photo press seems to have been slow to recognize the unique capabilities of these printers and give them a higher profile. In three months of use with this printer I have experienced precisely one clogged nozzle - easily remedied by one cleaning cycle. My only hope was that HP would soon make a "wide-carriage" version.
Then I became aware of Roy Harrington's QuadTone RIP printer driver for the Epson 2200 printer. I was concerned because it requires a Macintosh computer running OS-X. I am a Mac user, but I have always had trouble printing anything under OS-X. I'm happy to report that it works and works well. For the first time under OS-X I can print images the right size and properly positioned on the page. And in metamerism-free black and white too! I have now added my brief review of the QuadTone RIP.
In July 2005 I obtained an Epson Stylus Photo R-1800 printer. A preliminary report on the R-1800 may be found here. Examples of the R-1800 imaging characteristics were added here in late July 2005. This printer is not perfect, but is definitely the best of the Epson printers tested using an Epson driver.
A few digital cameras include a Black & White imaging capability. The Canon EOS D20 has this mode and my initial impression is that it works very well. I have not given it a thorough test, but B&W prints using the QuadTone RIP look very good. I cannot imagine producing a better 12 by 18 inch print with ISO 400 35 mm B&W film. The results are much better than I expected from 'only' 8 Megapixels. Prints are far superior to previous experiments with a D-60, converting a colour image to B&W using Photoshop. For a specific example of a b&w rendering from an ISO 1600 EOS 20D exposure see the end of this article.
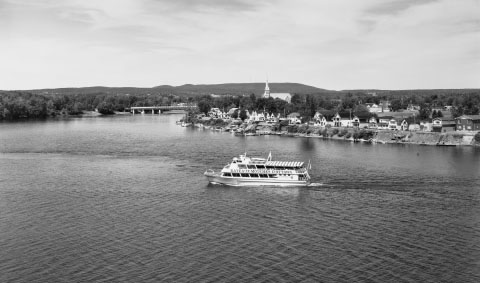
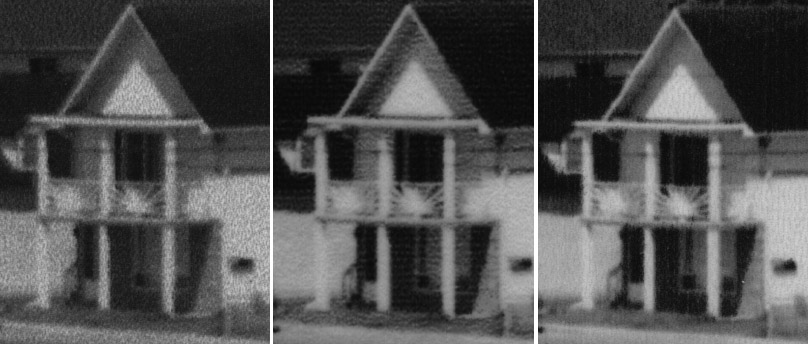
I offered a slight note of skepticism earlier on the quality of inkjet prints. There is (at least) one area where I believe inkjet prints have a problem. The problem is related to resolution, but it is not specifically resolution. In the design of half-toning algorithms used by inkjet printers one has to make a compromise between low-contrast resolution and smooth gradients. The algorithms by nature yield very high resolution for high-contrast detail, but low-contrast detail tends to get erased.Below is an example of what I mean. The net result of this is that we do need higher resolution, but it is probably not for the reason you thought. The reason is to achieve adequate texture in the highlight regions of the image. Here's a comparison of the same portion of an image (the one at the top of the page) printed at three print sizes, but then reduced after scanning to the same size for display here.
The above images shows a small portion of the boat shown in the image at the top of this page. The top left image is obtained from a 10 inch wide print made on the HP 7960 printer. The top center image is from a similar print made twice as large. The top right image is from a print made four times as large. The bottom image is from the Epson R-1800 printer at normal (10 in.)wide size. Since the 7960 only handles letter-size paper, only a portion of the full image could be printed at the two larger sizes. Nevertheless, we see the effect of either a) making same-size prints at 2x and 4x the resolution of the image at left, or b) making prints at the same resolution but twice and four-times as large. Greater printer resolution allows significantly better rendition of the low-contrast details present in the image. The Epson R-1800 image is a little better than the HP image at normal size, but not as good as the 2x HP image. (There is some motion blur in the above examples: the boat was moving and the shutter speed was a relatively slow 1/25 sec.)
It would be interesting to see how these ink jet prints compare with a dye sublimation print. So here's the dye-sub equivalent image:
Here the same portion of a 10-inch wide 300 pixel-per-inch print made on a Kodak dye sublimation printer. The image is certainly not "better" than the ink jet print, but some features of the highlight detail are retained better.
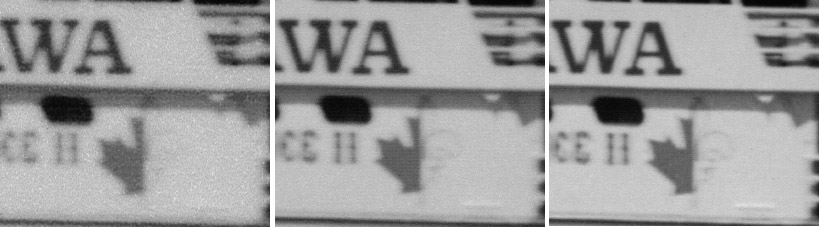
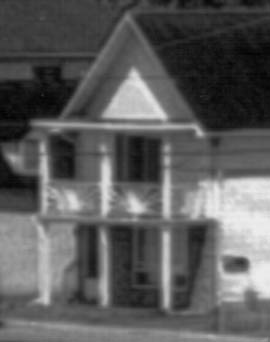
Here's a comparison of the printed results for a 10 inch wide print. These are 11x enlargements of the details of one of the houses, obtained by scanning the prints.

These three details are from 10 inch wide prints made with an Epson 2200 using the QuadTone RIP (top left), with the the HP-7960 printer (top center) and with an Epson 1280 using the PiezographyBWicc system (top right). The lower image is from an Epson R-1800 printer in Photo RPM mode. Each printing method has its strengths and weaknesses. In each of these examples we can find details that have been reproduced and others that have been suppressed. The QuadTone RIP result is somewhat grainy. The HP printer has streaks. The Piezography result is generally the smoothest, but even it has the odd problem here and there. The Epson R-1800 is not quite as smooth as the Piezography example, but otherwise compares favourably.
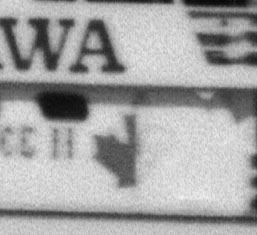
For comparison, here is the corresponding portions of a dye sublimation print and of the original scan of the negative:
Here's the detail from the 300 ppi dye sublimation print. In comparison with the ink jet prints, the dye sublimation has its own strengths and weaknesses. It appears as though some form of sharpening has been applied by the printer driver. (There are no sharpening artifacts in the file submitted to the printer, and no sharpening was done in the scanning process.) There is a moire pattern on the side of the house. Not evident in this b&w scan , but visible under a magnifier, is colour fringing caused by poor registration of the three dye images. On the other hand, the rendition of the stone front of the house is better than any of the ink jet prints.
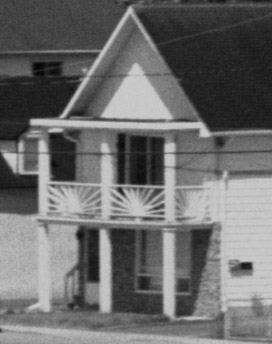
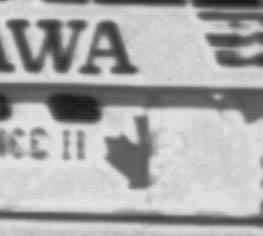
Here for comparison is the corresponding original image from a direct scan of the negative.
It must be stated that although these details at the scale reproduced here correspond to portion of an 9-foot-wide print, all the details shown above for the original image are visible using a magnifier in a contact print made from the original 5 by 7 inch negative! So clearly ink jet printers have quite a ways to go before they can compete with a contact print from a large-format negative. Ink jet prints for general direct viewing, however, can be quite satisfactory.

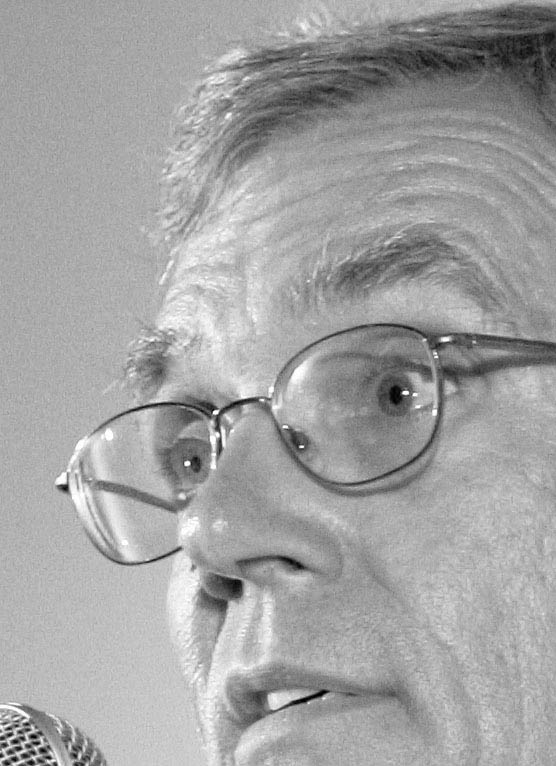
I took this photo of folk singer, Ted Jordan, in August 2005 under 'terrible' lighting conditions at a live performance. The 'stage' was lit with four lights: blue and yellow on the left with red and yellow on the right. And the wall behind was illuminated by standard tungsten recessed fixtures. It was necessary to have the ISO set to 1600 to permit a shutter time of 1/40 sec with the 70-200/2.8 lens at its maximum aperture. Although I could achieve passable colour balance for any one position on the stage, it was impossible to get things reasonable for groups. You can find some of the photos in colour here. I tried converting some of the images to B&W to get around the colour balance issue. And I was amazed how good the B&W images were. A portion of the above image of Ted Jordan is shown below pixel-for-pixel.
In order to do as well using film, I believe I would have had to use large format!
- Updated 16 August 2005.
Bach to the Top of This Page.
Back to Main Page Table of Contents.